Overview: Query Builder for Jira
With the Query Builder for Jira, you can create Custom Jira Metrics using a combination of Metrics, Dimensions and Filters.
How to access the Query Builder for Jira
Navigate toMetrics> Query Builderto access the Query Builder for Jira. Click the green+ Create CustomMetric button and select your connected Jira Account from theData Sourcedrop-down list.
Query Builder is available in Professional and Performer Accounts. Request a trial of Query Builder by followingthese steps.
How to use the Query Builder for Jira
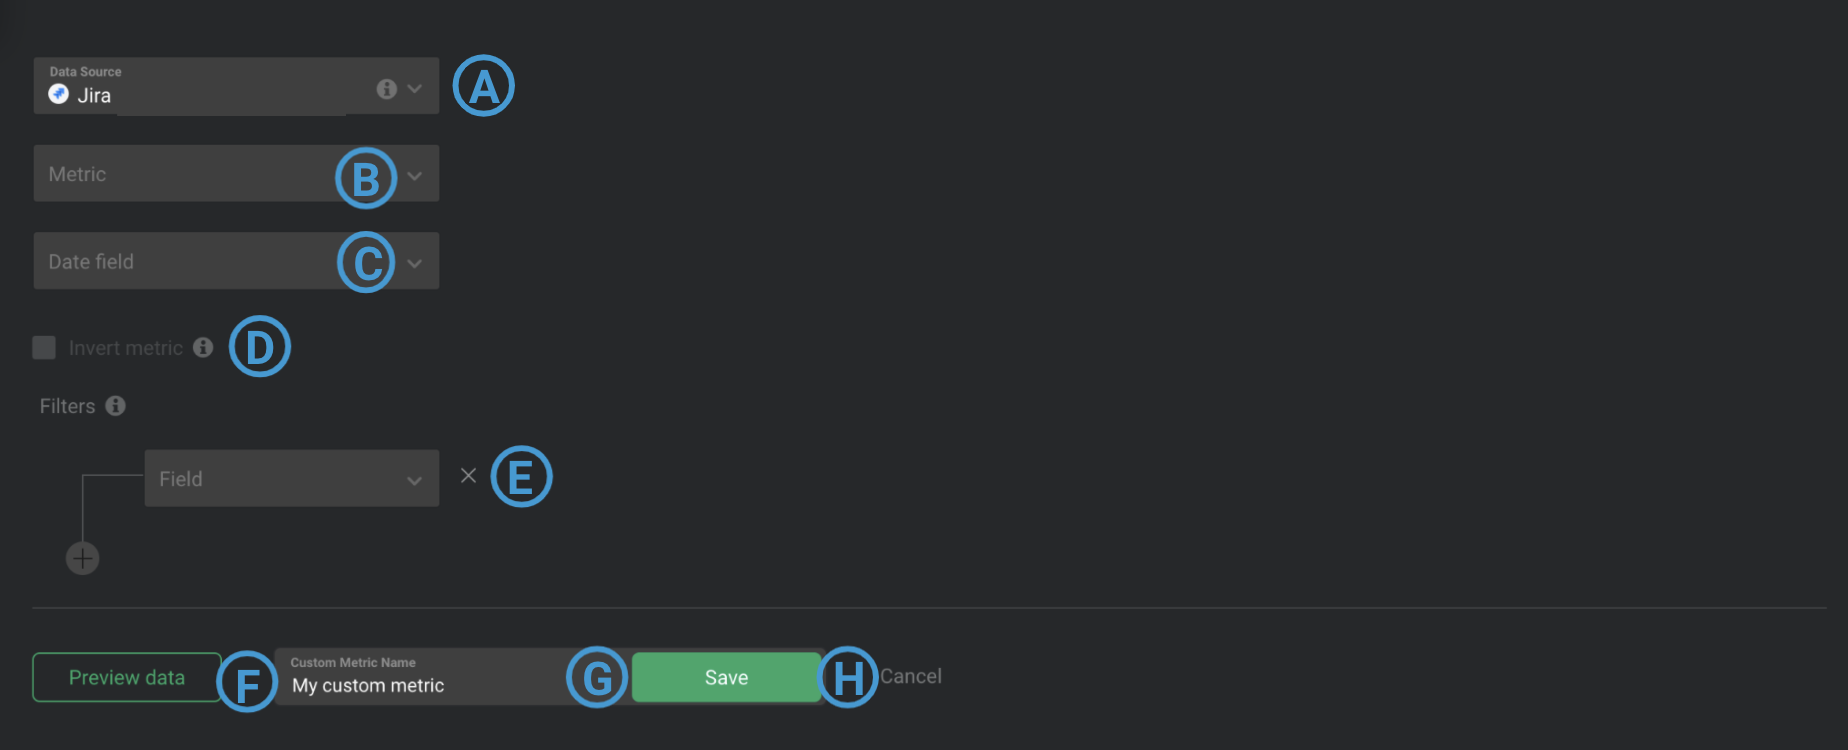
A
Data Source: This is the Data Source that the Custom Metric is syncing data from.
B
Metric: Select a Metric from your connected Jira Data Source, such as "Development," "Progress" or "Team." Selecting certain Metrics will expose theDimensionfield.
The Dimensions parameter re-categorizes the returned Metric value based on common criteria. Examples of Dimensions are "Assignee," "Project," and "Features." If no Dimension is selected, the Custom Metric will store 1 aggregated Metric value for each Date Range.
C
Date Field: The Date Field determines what to include in the Custom Metric. For example, if "Due Date" is selected, any tasks with a due date that falls during the specified Date Range(s) will be included in the Custom Metric. If "Created" is selected, any task that was created during the specified Date Range(s) will be included in the Custom Metric.
D
Invert Metric (Optional): This checkbox should be selected if a lower Metric value indicates positive growth / performance (i.e., Unsubscribers, Cost per Conversion, etc.) Inverting the Custom Metric in Databox will make it so an increase in the Metric value will show a red percentage change color on a Databolock, while a decrease in the Metric value will show a green percentage change color on a Datablock.Date Range: Select up to 8 Date Ranges that will be available for the Custom Metric. The Date Ranges selected are the only periods of time that data is synced for this Custom Metric.
E
Filter by(Optional):
Filters restrict the data that gets included in the Custom Metric. All data that is returned is tested against the Filter(s). Multiple Filters can be combined using AND/ OR boolean logic.
If the data synced from the Metric and Dimension fields meet the Filter specifications, the data is retained and included in the Custom Metric value. If the data synced from the Metric and Dimension fields don't meet the Filter specifications, the data is excluded from the Custom Metric value.
Only the first 15 Values returned will be displayed in the
Valuedrop-down list.
Follow these stepsto determine the exact Filter value and manually enter it into the
Valuefield.
F
Data Preview: After clickingPreview data, a Data Preview of the Custom Metric will be displayed. Daily Metric values are displayed in this section, along with the total Metric values for the Date Range in bold at the bottom. You can view the Data Preview for different Date Ranges by clicking on the drop-down list at the top of the Data Preview.
Pro Tip: If you don't know which Filters to put in place for your use case, use the Dimension + Data Preview to troubleshoot and get more insight into the data that is returned from your ira Account for each field. Learn morehere.
G
Custom Query Name: Enter a name for your Custom Metric. This Custom Metric name will be available in the Designer after saving.
H
Save: Save your Custom Metric.
How to create a Custom Jira Metric [Example]
In this example, we'll create a Custom Metric to report on Progress, split up based on the Creator. We only want to include tasks that are labeled "Urgent" or "High" Priority.

1Navigate toMetrics
> Query Builder
2Click the green+ New querybutton
3Select the appropriate Jira Data Source
4Since a "Progress" is what we're looking to track, we will selectProgressfrom theMetricdropdown list
5After selectingProgressas the Metric, a new field is exposed calledDimension. Click onDimensionand selectCreatorfrom the dropdown list. This will split up the Progress based on the task Creator
6We want to include any tasks that were updated during the specified Date Range, so we'll selectUpdatedas theDate Field
7Lastly, we want to restrict the Custom Metric to only retain data for Urgent and High Priority cases, so we'll add 2 Filters.
First, we'll open theFielddrop-down list and will selectPriority. TheOperatorselection will be=和第一ValueisUrgent. Since we want to include UrgentorHigh Priority, we'll click on the+标志to add another Filter. We'll selectORso only 1 Filter needs to be satisfied for data to be retained. For this Filter, we'll selectPriority
= High.
8为了准确地解释这个自定义我tric is reporting on, we'll name the Custom Metric "Progress by Creator (Urgent/ High Priority)"
9ClickPreview datato generate a Data Preview of the Custom Metric
10Once we confirm that these are the results we're looking for, we'll clickSaveto save the Custom Metric
How to add a Custom Jira Metric to a Databoard
Learn how to add a Custom Metric to a Databoardhere.
Additional Info
- Only the first 15 Values returned will be displayed in theValuedrop-down list.Follow these stepsto determine the exact Filter Value and manually enter it into the Value field.